Graphics evolved very quickly in the past 20 years from simple rasterizers to massive, real-time path tracers, that are largely parallel-scaled pieces of software, containing centuries of scientific work and research in the field of physics. Yet, somewhere it all started to get complex. It’s the year 1993 and a title, that contains a fox and some starships launched with a chip, that was capable of handling perspective-related calculations very performant for its time and enabling a kind of 3D game. From then on, publishers and engine architects focused on getting the best 3D experience possible to run on custom hardware for next consoles. Nintendo tried hard with the N64, but couldn’t fully achieve stable “good” looking shading in practice and was often perceived as being outpaced in terms of graphics by its competitor, the PS1. (Fun Fact: the PS1’s GPU was actually designed by Sony’s competitor, Toshiba, and was based on a licensed design from a company called VideoLogic. The PS1’s GTE was designed by Sony in-house, however.)
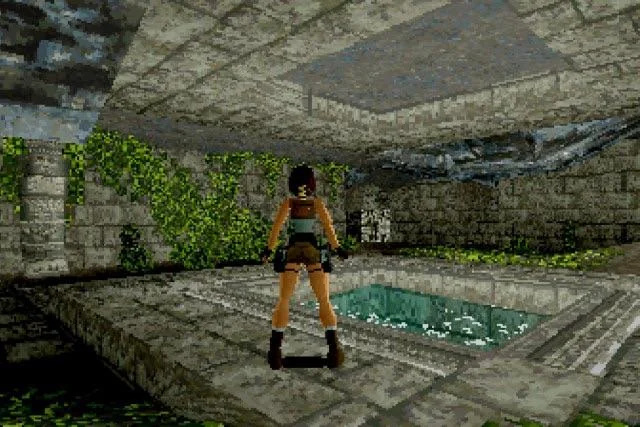
'Tomb Raider', released in 1996 for PS1.
The PS1 pushed its hardware to the limit by rasterizing roughly 3,000 to 5,000 textured triangles onscreen per frame, utilizing then-standard flat-shading as well as the game-changing "Gouraud shading." The iconic graphics also suffered from a lack of sub-pixel precision in the rasterizer, which led to the so-called "jittering" or "wobbling" effect when vertices (not pixels) snapped to the integer-based screen coordinate grid. All of this was achieved through hardware-accelerated 2D rasterization without a Z-buffer, relying instead on basic Ordering-Table rendering queues to push primitives to the VRAM where they could be rendered.
Today, we have modern APIs like Vulkan that enable us to bundle multiple data buffers and upload them at high speeds to highly accelerated GPUs. These modern chips feature programmable shaders and ray-tracing capabilities that can simulate real-world lighting in real time. But sometimes, I have the urge to do things the classic way and write code for the era where it all started. So, I set a goal for myself: to write a graphics engine API that operates within the software constraints of the original PlayStation (PS1), utilizing the same rasterizing, shading, and design choices. I will also use this project as a learning resource to dive deeper into specialized topics like graphics API design, byte-oriented data structures, and matrix mathematics.
The engineering of the backbone
First, I will have to start with the backbone of almost every real-time graphics pipeline: the graphics API. This is usually used to interact with specialized, accelerated hardware and driver software. The PS1 utilized a GTE (Geometry Transformation Engine) alongside a GPU that could only process 2D primitives. Because of today's hardware speeds, my laptop CPU can easily calculate frames in real time using a regular PS1 resolution and a pure software implementation. Graphics will be rendered to a 320 by 240, 16-bit color framebuffer just like the original PS1, which will be stored in the heap.
typedef struct ngfxFramebuffer {
    uint16_t* data;
} ngfxFramebuffer; // RGB555 backbuffer

ngfxFramebuffer* ngfxCreateFramebuffer();
void ngfxDestroyFramebuffer(ngfxFramebuffer* buffer);
void ngfxClearFramebuffer(ngfxFramebuffer* buffer, uint16_t color);
void ngfxFramebufferPutPixel(ngfxFramebuffer* buffer, int x, int y, uint16_t color);
For typical "render command" submission, the PS1 used a simple system designed by Sony that uploaded so-called "packets" to an Ordering Table using an index. This supported a form of depth sorting instead of using a modern Z-buffer. These packets were simple primitives structured as structs like:
struct POLY_F3 {
    u_long tag;       // The 32-bit header/pointer (managed by the API)
    u_long r0, g0, b0;// Color data
    short x0, y0;     // Vertex 0 screen coordinates
    short x1, y1;     // Vertex 1 screen coordinates
    short x2, y2;     // Vertex 2 screen coordinates
};
...which could be pushed to the ordering table using a function like addPrim(OT[z_index], &packet). I will use the same core system but with a modern twist. Immediate-mode APIs like Sony's are honestly hard to debug and tedious to read, so I implemented something inspired by Vulkan's design. In my system, primitives define raw data like position, UV coordinates, and vertex colors, whereas pipelines are bound to a single execution of a so-called "CommandBuffer", a concept introduced by Vulkan's sleek API architecture. This allows data and the instructions on how to manage that data to be gathered within the CommandBuffer. When submitted, this data is then sorted into an ordering table similar to the one found on the PS1. Here is an example of how this idea looks in practice:
// create pipeline, vertecies, blah blah blah
ngfxBeginCommandBuffer(cmd);
ngfxCmdBindPipeline(cmd, pipeline);
ngfxCmdTriangle(cmd, v0, v1, v2, 1); // push to cmdbuffer
ngfxEndCommandBuffer(cmd);
ngfxSubmit(device, cmd); // upload to OT
Here is a typical Vulkan code for comparison:
vkBeginCommandBuffer(cmd, &beginInfo);
// create renderinInfo data...
vkCmdBeginRendering(cmd, &renderingInfo);
vkCmdBindPipeline(cmd, VK_PIPELINE_BIND_POINT_GRAPHICS, pipeline);
vkCmdBindVertexBuffers(cmd, 0, 1, vertexBuffers, offsets); // triangles will be pushed to cmdbuffer
vkCmdDraw(cmd, 3, 1, 0, 0);
vkCmdEndRendering(cmd);
vkEndCommandBuffer(cmd);
So, now that I can upload basic triangles to the ordering table, it's time to feed the data to a rasterizer. Sony's rasterization was very basic and remains straightforward to implement. The original hardware converted incoming coordinates to fixed-point integers in screen space. This is where the famous jittering effect comes from: because the system lacked sub-pixel precision, the vertices snapped aggressively to the integer pixel grid during movement.
Jittering effect on PS1.
For my implementation, after calculating the bounding box of the triangle, I used Digital Differential Analysis (DDA), a classic line-drawing technique used by older generations of renderers to handle the rasterization. I tested the setup using a linear interpolation color-sampling approach (Gouraud shading) and utilized SDL2 to display the framebuffer in real time. And voilà: here is the famous rainbow triangle in 16-bit color space on a "abstracted" PS1 renderer!
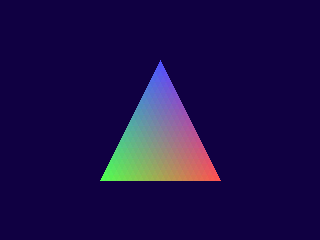
The famous rainbow triangle rendered in real time.
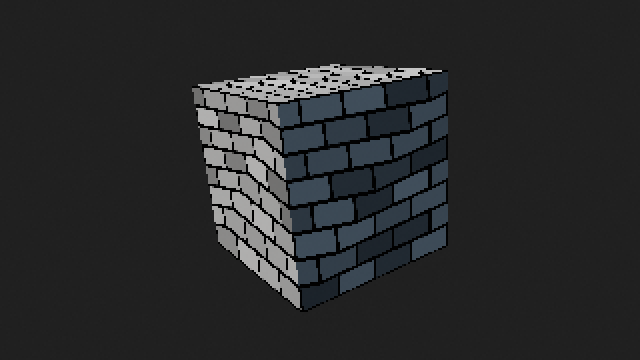
The third dimension
After successfully rendering a simple triangle, I wanted to add a bit more complexity to the scene. The PS1's GTE was designed to handle 3D transformations and perspective calculations, so I implemented a basic vertex transformation system that mimics the GTE's functionality. This includes functions for translating, rotating, and scaling vertices in 3D space, as well as applying perspective projection to convert 3D coordinates into 2D screen space. I also implemented a simple camera system that allows for basic movement and rotation, giving me the ability to navigate through a 3D scene. With these features in place, I was able to render a flat-shaded cube on a platform, which is a classic test for any graphics pipeline and the final outcome of my PS1 rasterizer implementation.
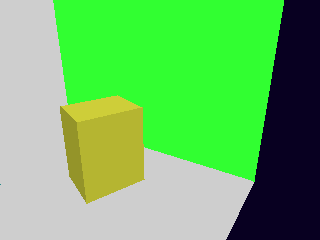
A flat-shaded cube rendered with a camera projection.